
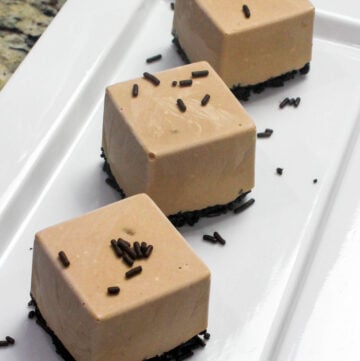
This chocolate yogurt bar will be the best, most indulgent sweet and cold treat when summer rolls around. Enter the world of chocolate yogurt bars—the perfect combination of creamy, chocolaty goodness and yogurt’s health benefits.

These popsicles are easy to make, require only three ingredients, and are the perfect way to satisfy your sweet tooth while keeping things lighter. Plus, they’re customizable! Whether you like extra chocolate chips, a drizzle of honey, or even some fresh fruit, you can tweak this recipe to suit your tastes. Make your own Yasso yogurt bars at home, and here is how.
Why You’ll Love This Recipe:
- Creamy Texture: The yogurt base gives these popsicles a smooth and creamy consistency without the heaviness of traditional ice cream.
- Healthy Ingredients: Packed with protein and probiotics from yogurt, these popsicles are a far better alternative to sugar-laden frozen treats.
- Customizable: Whether you want to add some extra sweetness with honey, mix in some fruit, or toss in some chopped nuts or chocolate chips, you can make this recipe your own.
- Simple & Quick: With just a few ingredients and minimal prep, these popsicles come together in no time.
Ingredients Needed for Chocolate Frozen Yogurt Bars Recipe
The recipe is straightforward and requires only 3 ingredients that you may have at home. If you want to learn to make yogurt at home without any yogurt markers, check out this recipe.

- Plain Greek yogurt
- Semi-sweet chocolate chips
- Heavy cream
- Vanilla extract -optional
Step–by–Step Instructions for Making Chocolate Yogurt Bar
1. Make Chocolate Ganache


Chop the chocolate: If you’re using a bar of chocolate, chop it into small pieces. This helps the chocolate melt evenly. Heat the heavy cream in a saucepan over medium heat until it begins to steam and tiny bubbles form around the edges, but don’t let it boil. You can use the microwave to warm the cream. Once the cream is heated, pour it over the chopped chocolate in a heatproof bowl. Let it sit for about 2–3 minutes to soften the chocolate. After softening the chocolate, gently stir the mixture with a whisk or spoon until it’s smooth and glossy.
2. Add the Yogurt
Add the yogurt to the chocolate ganache and mix until combined. Taste and adjust the sweetness to your likeness with honey.


3. Pour into Popsicle Molds
Once your mixture is ready, spoon it into your popsicle molds. Be sure to leave a little space at the top of each mold to allow the popsicle to expand as it freezes. Transfer the yogurt bar mixture into a measuring cup for easy pouring into the mold.
4. Insert Sticks and Freeze
If your popsicle mold comes with sticks, insert them into the center of each mold. If not, you can easily substitute wooden popsicle sticks or plastic spoons. Place the molds in the freezer and let them freeze for 4-6 hours or overnight until completely solid.


5. Unmold the Popsicles
After your popsicles have frozen, it’s time to remove them from the molds. To make it easier, run a little warm water over the outside of the molds for a few seconds to loosen the popsicles. Gently pull on the sticks to remove them.
6. Optional Toppings
Before serving, feel free to drizzle melted chocolate or honey over the popsicles or sprinkle them with chopped nuts or fresh fruit. You can also roll them in shredded coconut for an added texture boost.

7. Serve & Enjoy
Now, your chocolate frozen yogurt bars are ready to enjoy! They’re perfect as a refreshing afternoon snack, a fun dessert, or even a healthier summer party option.
Tips & Variations:
- Flavor Variations:
- For a richer chocolate flavor, use dark cocoa powder or melt some dark chocolate and mix it in.
- If you prefer a fruity twist, blend in some fresh strawberries or raspberries into the yogurt mixture before freezing. You can even swirl in a fruit puree for a marbled effect.
- Use Flavored Yogurt:
Instead of plain Greek yogurt, try flavored yogurt, such as vanilla or chocolate, for an added taste. Just remember that flavored yogurts may add extra sugar, so adjust your sweetener accordingly. - Dairy-Free Option:
If you’re looking for a dairy-free or vegan version, swap the Greek yogurt for coconut or almond milk-based yogurt and use a plant-based sweetener like agave syrup or coconut sugar.
How to Store the Chocolate Yogurt Bars

Store your popsicles or bars in an airtight container in the freezer for up to 2 weeks. If you’re making a large batch, you can individually wrap each popsicle in plastic wrap to prevent them from sticking together.
More similar recipes you’ll like
Don’t Want to Miss a Thing?
Follow me on Pinterest, Facebook, YouTube, and Instagram to keep up with the latest news from Duchez Kitchen.
If you have any questions about this recipe, I would love to hear them in the comment section below. Did you make this recipe? Let me know by leaving a review and recipe rating below. Tag me @ #theduchezkitchen- on Instagram, YouTube, and Facebook.
Thanks for reading. As always, know that God loves you, and stay blessed!
Happy Blending!
Linda!!

Chocolate Yogurt Bars Recipe
Equipment
- popsicle mold
- popsicle sticks
Ingredients
- 2 cup Greek Yogurt
- 1 cup semi-sweet chocolate chips
- ½ cup heavy cream
- 1 teaspoon vanilla extract- optional
Instructions
- Make Chocolate Ganache
- Chop the chocolate: If you’re using a bar of chocolate, chop it into small pieces. This helps the chocolate melt evenly. Heat the heavy cream in a saucepan over medium heat until it begins to steam and tiny bubbles form around the edges, but don’t let it boil. You can use the microwave to warm the cream. Once the cream is heated, pour it over the chopped chocolate in a heatproof bowl. Let it sit for about 2–3 minutes to soften the chocolate. After softening the chocolate, gently stir the mixture with a whisk or spoon until it’s smooth and glossy.
- Add the Yogurt
- Add the yogurt to the chocolate ganache and mix until combined. Taste and adjust the sweetness to your likeness with honey.
- Pour into Popsicle Molds
- Once your mixture is ready, spoon it into your popsicle molds. Be sure to leave a little space at the top of each mold to allow the popsicle to expand as it freezes. Transfer the yogurt bar mixture into a measuring cup for easy pouring into the mold.
- Insert Sticks and Freeze
- If your popsicle mold comes with sticks, insert them into the center of each mold. If not, you can easily substitute wooden popsicle sticks or plastic spoons. Place the molds in the freezer and let them freeze for 4-6 hours or overnight until completely solid.
- Unmold the Popsicles
- After your popsicles have frozen, it’s time to remove them from the molds. To make it easier, run a little warm water over the outside of the molds for a few seconds to loosen the popsicles. Gently pull on the sticks to remove them.
- Optional Toppings
- Before serving, feel free to drizzle melted chocolate or honey over the popsicles or sprinkle them with chopped nuts or fresh fruit. You can also roll them in shredded coconut for an added texture boost.
- Serve & Enjoy
- Now, your chocolate frozen yogurt bars are ready to enjoy! They’re perfect as a refreshing afternoon snack, a fun dessert, or even a healthier summer party option.


Leave a Reply