
Cakesicles or Cake popsicles are a high-end version of the traditional cake pop. These are made in popsicle molds and are easy to make at home. They make a perfect gift for any occasion, and they will wow your friend and family too. In a nutshell, cakesicles are chocolate-covered cake on stick

This recipe is made with homemade vanilla cake and cream cheese. The cream cheese is the secret ingredient that makes these taste like ice cream cake pop.
More about this Popsicle cake
• They are homemade with no preservatives so there is no need to order cakesicles online
• They are made by painting chocolate into a silicone mold and filling it with a mixture of cake and frosting. The silicone cakesicle molds make a perfect shape any time.
• You can decorate these popsicles cakes in your own way to match your type of event. Customize the popsicles with different candy melts colors.
• The process is very easy, and any level skill baker can make these cake popsicles. if you have struggled to dip cake pops then this will be a perfect recipe to try.
• I like to make these and give them out as presents for friends and family. You can create these as party favors for guests or kids’ parties.
What are cakesicles made of?
Cake popsicles or cake lollipops are made of three main ingredients.
• Cake: I used vanilla cake but any type of cake that is moist will work with this recipe. You can use chocolate cake to make chocolate cakesicles as well.
• Frosting: any flavor of frosting that pairs well with the selected cake will work. For this recipe, I used cream cheese as the frosting and made them taste like cake pop ice cream. buttercream frosting will work too.
• Chocolate: I used Ghirardelli candy white chocolate for the shell. You can use the same method to make milk chocolate or dark chocolate cake lollies. I highly recommend using pure chocolate but i found that using candy melts is easier.
How to Make them
This is an overview of how to make popsicles cakes. The detailed instruction can be found on the recipe card below.
Bake the Cake
Bake your cake a day before making the pop cakes. Any cake recipe will work, and this is the vanilla cake recipe I used for my popsicle cake. A box cake or store-bought cake is also an option, so the choice is yours.

Make the Cake Ball/ Filling
Crumble the cake into a bowl of a stand mixer or large mixing bowl. Using the stand mixer or your hand break the cake into breadcrumbs texture. Then add the softened cream cheese or frosting. Mix the cake and cream cheese until combined. Add more cream cheese as needed to the cake mixture to form dough-like playdough or truffle texture. When you squeeze in your hand, they should hold their shape. The consistency is the same as cake pops filling.

Melt the Chocolate
Melt the candy melts or temper the chocolate if using pure chocolate. I like the Ghirardelli candy wafer since it has a nice taste, and it is very easy to melts and use for dipping too. To melt the wafers, place them in a microwave-safe container and microwave at half power or defrost setting for 30 seconds. Stir and continue to microwave in 15 seconds intervals and stir until melted.

How to Temper Chocolate
Place chocolate in a microwave-safe container and microwave at half power for 30 seconds intervals. Remove and stir each time before returning to the microwave and repeat. The number of times will depend on the amount of chocolate and the microwave so monitor the chocolate closely. By the third time, the chocolate will be almost melted but there should be small pieces of whole chocolate in the melted chocolate. Stir until all the chocolate is melted. If you want to be certain that the chocolate is well tempered, then use a thermometer to check the temperature. The temperature of the melted chocolate should be between
• 88 F – 91 F (31 C – 32 C) for dark chocolate
• 86 F – 88 F (30 C – 31 C) for milk chocolate
• 84 F – 86 F (29 C- 30 C) for white chocolate
If the temperature is above these numbers stated above, continue to stir to reduce the temperature. if the temperature is still high then add a few extra chocolate pieces to the melted chocolate. Then stir until melted and check the temperature again.
Make the chocolate shell
To make the chocolate shell, spoon 1 tablespoonful of chocolate into the popsicle mold. Brush the chocolate up the sides of the mold or tilt the mold for the chocolate to cover the sides of the mold. While the chocolate is still wet, insert a popsicle stick, then remove it. This will keep the hole for the popsicle stick free of chocolate.
Place the mold into the freezer for 3-5 minutes (refrigerator if using pure chocolate), just until hardened. Then add a teaspoon of second layer chocolate and paint around the edges of each popsicle cavity. Chill for about 2 minutes for the chocolate to firm up. If you do not have a microwave, you can make it on a double boiler.

How to form the cake popsicles
There are a few different ways of forming cake popsicles. The first option is to use the cake popsicles mold to form the cake shape, then insert the popsicle sticks, and chill until firm. Then unmold and dip it into the chocolate and set it on parchment paper to set.

The second option is to make the chocolate shell using then add the cake filling about 1 tablespoon of the cake filling. Press down firmly to make sure there are no spaces in between. Insert the popsicle sticks into the cake mixture halfway and add additional chocolate to cover and seal them. Smooth them using a spatula or bowl scraper, then refrigerate to firm up the chocolate. Bring them out and unmold the cake popsicles carefully.

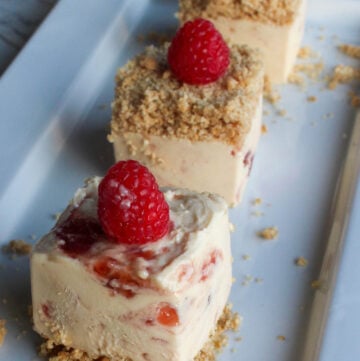
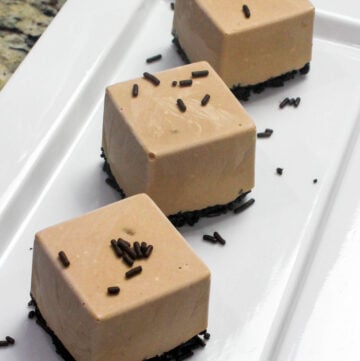
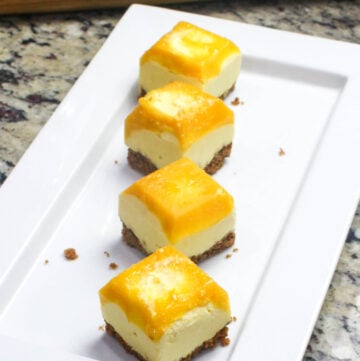
How to Decorate the Cakesicles
When the popsicle cakes are made and firmed up, then it‘s time to decorate them. You can drizzle melted chocolate on top and add some sprinkles to it. Another option is to use colored candy melts to match an occasion or add gold dust or edible glitter for a fun touch.

Cake Popsicles Variations
In this recipe, I will show how to make cake pops with mould using vanilla cake and white candy melts, but you can use white chocolate too. But remember, when using pure chocolate which contains cocoa butter then you need to temper the chocolate before using. More about tempered chocolate later.
Other variations or cakesicles flavors you can make include red velvet cake popsicles recipe or valentine’s day cakesicles. Carrot cake can also be used for Easter cakesicles recipe for the holiday table. For Christmas cakesicles, use red and green candy melts to add a festive touch and the same for Halloween cakesicles. You can also make birthday popsicle cake pops, as you can see the possibilities are endless.

What is the difference between Cake popsicles and Cake pops?
Cake popsicles and cake pop use the same cake filling and are covered with chocolate. The process of making the ball and dipping it in chocolate differs slightly. Unlike cake pop, which is rolled into a ball, and then dipped into chocolate, a cake popsicle is made by painting the chocolate into a mold before adding the cake filling.
Cake pops can sometimes be challenging to dip into chocolate. They can crack and fall off the lollipop stick but using cakesicles mold are easier and produce smooth and shiny molded cakes. I know sometimes you can use cake pops mold to form a smooth ball, but you still must dip them in chocolate.
How to Store Cakesicles
Cakesicles can last for a while if wrapped in individual plastic wrap. They can be stored up to 3 days at room temperature and 1 week in the refrigerator or freeze up to 6 weeks. When ready to use, bring them to thaw overnight in the refrigerator before bringing it to room temperature. This will reduce temperature shock and prevent the chocolate from cracking.
How Long do cake popsicles last at Room Temperature?
Popsicle cake will not keep that long at room temperature especially when you are using perishable frosting. I recommend not to keep at for more than 3 days at room temperature.

Can cakesicles be frozen?
Yes! they can be wrapped in individual plastic wrap and then stored in a Ziplock bag or freezer-safe container and keep them in the freezer for up to 6 weeks.
Why are my Cakesicles Cracking?
Chocolate will usually crack when it is very cold. To prevent the cake lollipop from cracking, the cake should be at room temperature before dipping it into the chocolate. You can take them out of the freezer immediately after they hardened. When using pure chocolate, I recommend you put the cake pops in the refrigerator to firm up.
How to make cakesicles without mold
if you don’t have a mold no problem! You can still make these fancy cakes at home just like making pops cakes but this time you will shape the cake and frosting mixture into a rectangle using your hands. Dip the popsicle sticks into melted chocolate before inserting them into them, this will prevent the cakes from sliding off the stick.
Watch How to Make them
A quick note, I have used cakesicles, cake popsicles, lollipop cakes interchangeably and refer to the same thing. But there is a difference between cakesicles and cake pops.
The silicone mold used will yield about 12 cakes and you can double the recipe. You can use fondant to decorate and create unique characters as well.
You can also get other mold designs online.
How to Package
when all the decorations have been set and dried, you can package them in bakery boxes or wrap them into individual treat bags and add a bow.
Other Recipes
CHOCOLATE CARAMEL APPLE SLICES
If you have any questions about this recipe, I will love to hear about them in the comment section below. Did you make this recipe? Let me know by leaving a review and recipe rating below. Tag me @ #theduchezkitchen- on Instagram and Facebook? Find me @theduchezkitchen.
Thanks for reading. As always, know that God loves you, and stay blessed!
Happy baking
Linda

How to Make Cakesicles (Cake popsicles)
Equipment
- silicone Cakesicle mold
- Food thermometer
- Small paintbrush
Ingredients
- One 6-inch layer cake
- 2 tablespoons cream cheese softened add more as needed
- 20- ounce (500g) Ghirardelli white wafer
- Sprinkles for decorating
Instructions
- Filling
- Crumble the cake into a bowl of a stand mixer or large mixing bowl. Using the stand mixer or your hand break the cake into breadcrumbs texture.
- Then add the softened cream cheese or frosting. Mix the cake and cream cheese until combined. Add more cream cheese as needed to the cake mixture to form dough-like playdough or truffle texture. When you squeeze in your hand, they should hold their shape. The consistency is the same as cake pops filling. They should be soft but not greasy
- Chocolate Coating
- Place chocolate wafer in a microwave safe bowl and microwave at half power or defrost setting for 30 seconds. Stir and continue to microwave in 15 seconds intervals and stir until melted.
- Spoon 1 tablespoonful of chocolate into the popsicle mold. Brush the chocolate up the sides of the mold or tilt the mold for the chocolate to cover the sides of the mold. While the chocolate is still wet, insert a popsicle stick, then remove it. This will keep the hole for the popsicle stick free of chocolate.
- Place the mold into the freezer for 3-5 minutes (refrigerator if using pure chocolate), just until hardened. Then add a teaspoon of second layer chocolate and paint around the edges of each popsicle cavity. Chill for about 2 minutes for the chocolate to firm up. If you do not have a microwave, you can make it on a double boiler.
- Filling your cake popsicles
- scoop about 1 tablespoon of the cake filling into the mold. Press down firmly to make sure there are no spaces in between. Insert the popsicle sticks into the cake mixture halfway and add additional chocolate to cover and seal the top. Smooth them using a spatula or bowl scraper, then refrigerate to firm up the chocolate. Bring them out and unmold the popsicles carefully.
- Decorate and enjoy.
Notes
you can use fondant to decorate and create unique characters as well.
you can also get other mold designs online. How to Package
when all the decorations have been set and dried, you can package them in bakery boxes or wrap them into individual treat bags and add a bow.
How to Temper chocolate
Place chocolate in a microwave-safe container and microwave at half power for 30 seconds intervals. Remove and stir each time before returning to the microwave and repeat. The number of times will depend on the amount of chocolate and the microwave so monitor the chocolate closely. By the third time, the chocolate will be almost melted but there should be small pieces of whole chocolate in the melted chocolate. Stir until all the chocolate is melted. If you want to be certain that the chocolate is well tempered, then use a thermometer to check the temperature. The temperature of the melted chocolate should be between
• 88 F – 91 F (31 C – 32 C) for dark chocolate
• 86 F – 88 F (30 C – 31 C) for milk chocolate
• 84 F – 86 F (29 C- 30 C) for white chocolate If the temperature is above these numbers stated above, continue to stir to reduce the temperature. if the temperature is still high then add a few extra chocolate pieces to the melted chocolate. Then stir until melted and check the temperature again.


Helpful post thank you so much for putting up this article. I really the entire process and have also shared it with my sister so that eve she tries it out.
Hi Supriya,
Thank you for the feedback and for sharing the post.